Guides / Integration
Setting Up OHIP Validation
We are pleased to offer real-time OHIP validation within our kiosk check-in workflow. There is no additional charge for this feature.
To enable this feature, the most important step is to contact us. Tell us that you’d like this feature, and our team will work with you to confirm the details of this typical process:
A patient attempts to check-in via our kiosk
The patient’s OHIP is checked in real-time to ensure it is valid
If valid, the patient can continue to check-in normally
If not currently valid, some alternative outcome can occur (e.g. perhaps the patient cannot check-in via the kiosk, and must instead proceed to a human receptionist).
Designating Go Secure Access
In order to enable real-time OHIP validation on the CHIME Kiosk, we will need one clinic physician to designate Go Secure access to us. This is usually the clinic’s medical lead or lead physician, but it can be any clinic physician with Go Secure access.
This is required because all OHIP validation must be done on behalf of a registered physician, as identified by their OHIP billing number.
We typically perform all validation for the clinic via this single physician’s delegated authority. The alternative (asking every clinic physician to delegate access, and then attempting to validate each patient using their corresponding physician’s access) is complex and not required.
For organizations with multiple locations, a single physician across the entire organization is preferred. There is no need to have different physicians for different locations.
This is the case even for clinics where physicians submit their own billings using their own billing numbers, whether or not a group billing number is used.
If there is no clinic physician able to designate Go Secure access to us per the instructions below, please speak with your CHIME account manager to discuss potential alternatives.
Setup real-time OHIP validation on the CHIME Kiosk
1 ) Your clinic’s medical lead / lead physician should designate Go Secure access to the following account: gosecure@chimeclinic.com and individual (Keith Chung). Please have them do this designation using their personal, not their group account.
2 ) Once this designation is complete, please email your CHIME account manager with the following information:
The full name of your clinic’s medical lead / lead physician
The OHIP billing number of your clinic’s medical lead / lead physician
Confirmation that delegation has been made to gosecure@chimeclinic.com
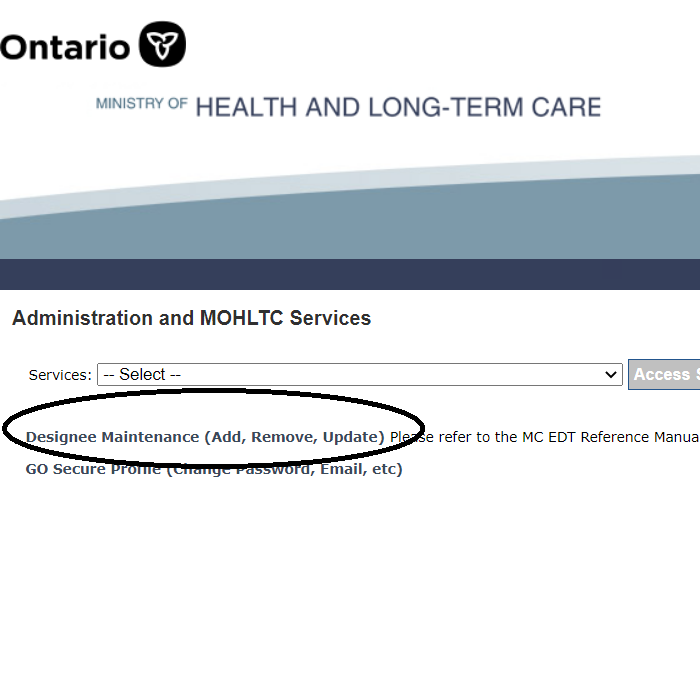
3 ) We will confirm the delegation with Go Secure. We will then ask you to go back into your Go Secure account, and limit the access to information that we have. This is done as follows (see screenshots)
The physician should sign into their Go Secure account.
On the first page, click the link that says “Designee Maintenance”
Our account, gosecure@chimeclinic.com, should be listed as “confirmed” in the “Service Access” heading.
Click on the email address gosecure@chimeclinic.com
Click on the underlined link “MC EDT Service”
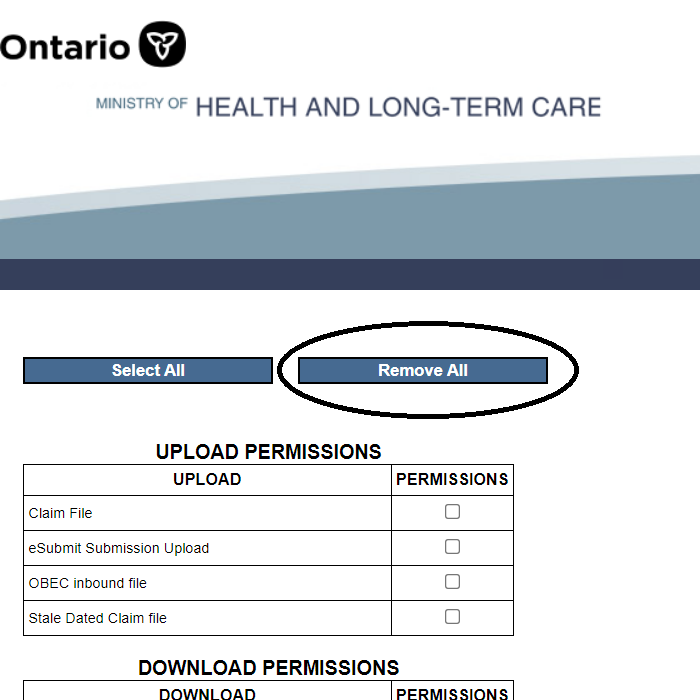
Click on “Remove all”, then scroll down and click “Save”


4 ) Once this is done, please email your CHIME account manager to advise them that the permissions have been updated.
5 ) Our team will check to ensure we do NOT have access to your MC EDT documents (e.g. RAs, error reports, etc.) If we have access, we will let you know and ask you to try again.
6 ) Once everything is good, we will work with you to design the appropriate patient workflow for your CHIME Kiosk
Thank you!