Guides / Basic Staff Walkthrough
Receptionist Daily Use of CHIME
This section details the many ways in which CHIME can be used day-to-day by Receptionist staff, and tries to bring a more comprehensive understanding of what CHIME actually is and what it does.
What is CHIME?
CHIME has three main components:
Wall Mounted Tablets outside each room and allow nurses, clinicians and other staff members to
Check in and out of appointments
Add extra steps to appointments (e.g. vaccinations)
See which rooms need cleaning
See what patient is next in their queue
A Central Flow Dashboard that’s accessible via a browser and allows staff members, nurses, and clinicians to:
Check patients in as they arrive
Edit appointment information and add extra steps (e.g. vaccinations)
View and edit patient queues
Edit rooms
Advance appointment status
An Auto Pilot that decides who should do what, when.
These components are constantly talking to each other to make sure that everyone stays in sync.
Which component am I using?
Reception staff will generally use the Central Flow Dashboard.
The Central Flow Dashboard is divided into 3 main parts. From left to right they are:
The Scheduled Queue — this displays all of the patients that are scheduled for today
The Admitted Queue — this display all of the patients that have been checked into the clinic, organized by their respective clinicians
The Rooms Queue — this displays all of the rooms and what states they are in
What do I need to do? What is my workflow?
Receptionists will use CHIME to:
Assign clinicians to exam rooms for the day
Check in patients when they arrive in clinic
Room patients into the appropriate rooms
Manage patient flow through the clinic
Coordinate staff, nurses and clinicians
How do I.…
How do I access the Central Dashboard?
Click on your bookmarked link on your computer desktop. It should have a label of CHIME.
Once on the “Useful Links” screen, Click on the “NORTH” or “SOUTH” flow view depending on which reception area you are located in.
How do I import or update the list of patients for the day?
CHIME will pull appointments from your EMR automatically, all throughout the day. If you would like to update immediately after making a change to an appointment in your EMR, use the “update” button in the upper left corner.
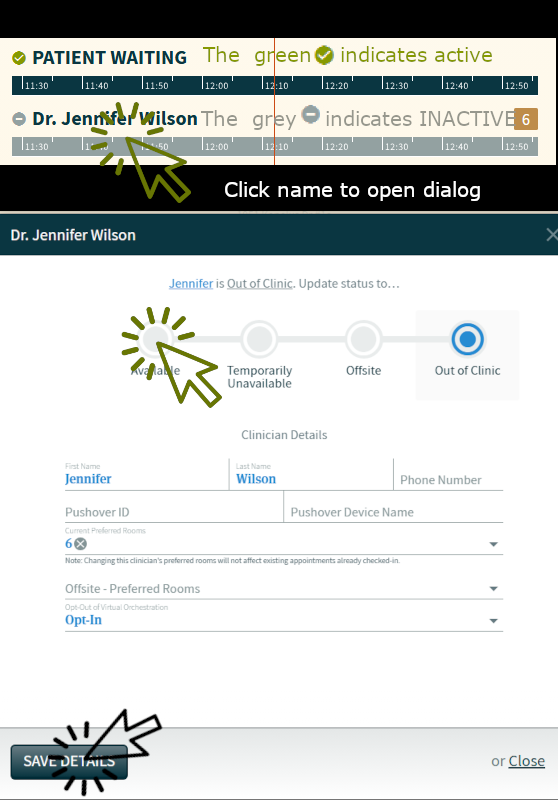
How do I make a clinician Available?
Click on the name of the physician (you may have to scroll down to find the name).
In the pop-up window, click on the appropriate status.
Click on Save Details.
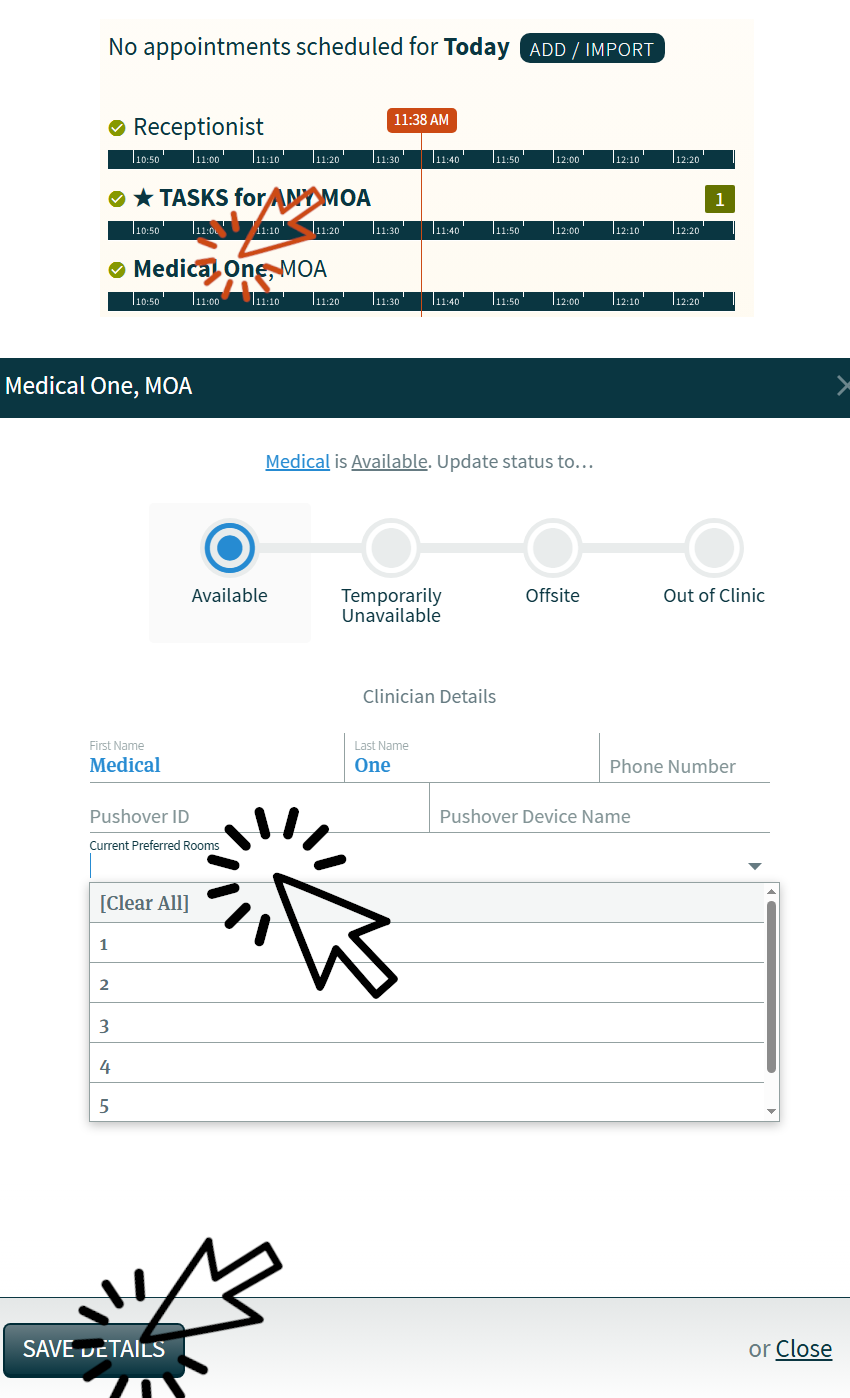
How do I assign clinicians to rooms for the day?
Click on the name of the physician (you may have to scroll down to find the name).
In the pop-up window, click on the “Preferred Rooms” section and choose the appropriate room(s).
How do I check in patients when they arrive at the clinic?
Look at the Scheduled Queue list and find the correct patient.
If the patient is there, hover your mouse over the patient’s appointment and click on the black “CHECK IN” button that appears on the right side of the line.
If the patient is not there, add the patient manually by following “How to add patients manually” instructions below.
How do I assign patients to rooms? There are 2 options:
Option 1:
Once patients have been checked in, their name will appear in the “R” or “Reception” area of CHIME located on the top of the Rooms Queue.
Click and hold on the patient’s name and drag the patient into the correct room.
Option 2:
Hover over the patient’s name under the “Receptionist” on the Admitted Queue list
Click the “ADVANCE” button that pops up. This will automatically assign the patient to the correct room based on the clinician who is scheduled see them.
How do I add patients manually?
Sometimes the patient will not be in the Scheduled Queue.
Add the patient to CHIME manually by:
Click on the “Add Patient” icon on the bottom right of the screen.
Fill in the patient information.
Fill in the correct appointment time at the top.
Choose the correct service from the drop-down menu.
Add the appointment reason in the ‘notes’ section.
Choose the correct clinician/staff as needed.
Click on the “Add Patient” button when ready.
Adding multiple patients in the same appointment manually:
In the notes section, add the patient name and the service they require. Eg. "John: Vaccines, Jane: ht/wt".
If multiple providers are needed (such as a two step appointment where the patient sees the MD, and then the nurse) you can select another service from the dropdown menu to add it to the appointment. Services will be completed in order. They can be rearranged by clicking and dragging on the icon beside the service name, or deleted using the trash bin icon on the right
How do I add additional services to a patient appointment?
Find and click on the patient in the Admitted Queue.
In the pop-up window:
Choose one of the pre-defined services as listed or add a custom service by clicking on the “Add Service” drop-down menu.
Choose the appropriate clinician/staff as needed.
Click “Save Patient” button on bottom of the pop-up window.


